This Halloween, why not take your costume to the next level with the addition of some fabulous Halloween nails?
Not only do they add an extra touch of style to any outfit, but they can also be a fun and creative way to get into the Halloween spirit.
Here’s everything you need to know about Halloween nails.
What Are Halloween Nails?
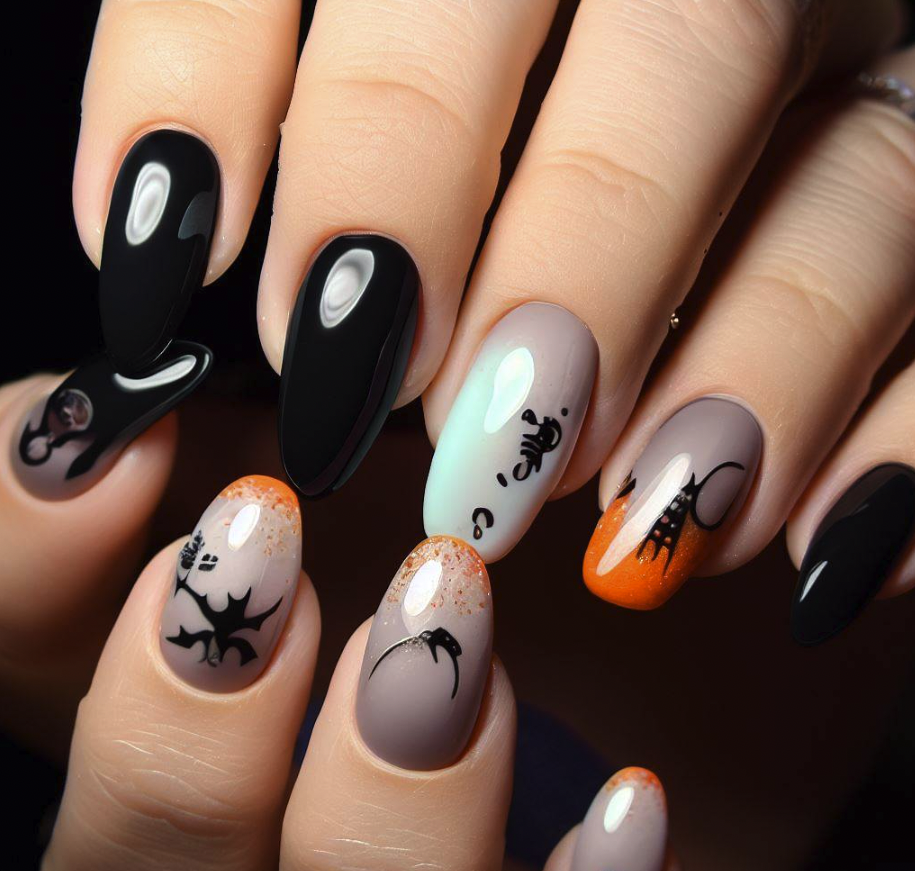
Halloween nails are manicures designed with Halloween-themed art or designs.
These can be as simple as a classic black and orange color scheme, or as complex as intricately hand-painted designs featuring traditional Halloween icons such as ghosts, witches, jack-o-lanterns, and more.
They’re a popular choice for Halloween enthusiasts looking to incorporate the spirit of the holiday into every detail of their appearance.
How to Do Halloween Nails
Creating Halloween nails can be as easy or as complex as you make it. Here’s a simple step-by-step guide:
- Choose Your Design: Look for Halloween nail art inspiration online or in magazines. Don’t be afraid to get creative – this is your chance to express your individual style.
- Prep Your Nails: Start with clean, trimmed nails. Apply a base coat to protect your natural nails and help the polish adhere better.
- Apply Your Colors: Choose nail polish colors that match your design. Apply the base color first and let it dry completely before adding details.
- Create Your Design: Use a nail art brush or a dotting tool to create your Halloween designs. If you’re not confident in your drawing skills, consider using nail stickers or decals.
- Seal Your Design: After your nail art has dried completely, apply a top coat to seal the design and add shine.
These 🎃Halloween Nail designs🎃 are so Cool and Easy 😍 Nails Tutorial Inspo ✨
Cute Halloween Nails
While Halloween nails often depict traditional scary themes, they can also be adorable!
Consider a design with cute ghosts, tiny candy corns, or playful bats.
Pumpkins, especially with a smiling face, can be both cute and very much in the spirit of the holiday.
You can also play with pastel Halloween colors for a softer, cute Halloween vibe.
Simple Designs Halloween Nails
For those who prefer a minimalist aesthetic, simple Halloween nails are a great choice.
You can simply alternate traditional Halloween colors like black, orange, and white on each nail.
Another option is to choose one small symbol, like a tiny ghost or bat, and paint it on one finger while keeping the others a solid color.
Don’t underestimate the power of a simple, clean design to make a statement.
How Much Do Halloween Nails Cost?
The cost of Halloween nails can vary widely depending on where you get them done, the complexity of the design, and whether or not you opt for gel or acrylic nails.
A basic manicure with Halloween-themed colors will likely cost between $20 to $40.
However, intricate, hand-painted designs or the addition of gemstones or decals can increase the price to anywhere from $50 to over $100.
DIY Halloween nails are a more budget-friendly option, with the cost only being for the nail polish and tools you don’t already have.
MONSTER HIGH HALLOWEEN NAILS! SAVILAND BEGINNER ACRYLIC KIT | NAIL ART TUTORIAL
How Long Do Halloween Nails Last?
The longevity of your Halloween nails depends on the type of polish and the care you give them.
Regular nail polish can last for a week or so with proper care, while gel or acrylic nails can last anywhere from 2 to 3 weeks.
Using a good quality top coat can extend the life of your manicure.
Avoiding harsh chemicals and wearing gloves when doing chores can also help your Halloween nails last longer.
How to Take Off Halloween Nails
Removing your Halloween nails should be done with care to avoid damaging your natural nails.
For regular polish, use an acetone-free nail polish remover and a cotton ball.
Soak the cotton ball in the remover, apply it to the nail, and gently rub until all the polish is gone.
For gel or acrylic nails, the process is a bit more complex.
It’s recommended to go to a professional to avoid damaging your nails.
However, if you choose to remove them at home, soak your nails in an acetone solution, then gently file or buff away the softened product.
Conclusion
Halloween nails are a fun way to add an extra dash of spookiness to your Halloween festivities.
Whether you opt for cute designs, simple patterns, or elaborate art, you’re sure to make a statement with your manicure this Halloween season.
Remember to care for your nails properly, and they’ll look fantastic throughout all your Halloween events.
So get inspired, get creative, and most importantly, have fun with it!
FAQs – Halloween Nails
1. What are Halloween nails?
Halloween nails refer to nail designs and art created specifically for the Halloween season.
These designs often feature spooky, creepy, or festive themes related to Halloween, such as pumpkins, ghosts, witches, bats, skulls, or other symbols associated with the holiday.
2. What are some popular Halloween nail ideas for 2023?
For 2023, some popular Halloween nail ideas include:
- Witchy nails with spider webs and potion bottles.
- Pumpkin-inspired nails with jack-o’-lantern faces or pumpkin patterns.
- Ghost nails with cute or eerie ghost designs.
- Skeleton nails featuring skeletal hands or bone patterns.
- Black cat nails with cat silhouettes or paw prints.
- Spider nails with spider webs or tiny spider accents.
- Vampire nails with blood drips or fang designs.
- Witch hat nails with witch hat silhouettes or hat patterns.
- Zombie nails with decaying flesh or stitches.
3. How can I create cute Halloween nails?
To create cute Halloween nails, you can try the following ideas:
- Use pastel colors like pink, lavender, or mint green as a base and add cute Halloween-themed accents like smiling pumpkins, adorable ghosts, or cute bats.
- Apply a light-colored nail polish as a base and use a dotting tool to create cute Halloween characters such as smiling spiders, friendly witches, or cute skeletons.
- Add small rhinestones or glitter in Halloween colors like orange, black, or purple to add a touch of sparkle and cuteness to your nails.
- Experiment with different nail shapes, such as short and rounded nails, to enhance the overall cuteness factor.
4. How can I achieve black Halloween nails?
To achieve black Halloween nails, follow these steps:
- Start by preparing your nails. Remove any existing nail polish and shape your nails as desired.
- Apply a base coat to protect your nails and help the nail polish adhere better.
- Once the base coat is dry, apply two coats of black nail polish. Make sure to wait for each coat to dry before applying the next.
- If you want to add some extra flair, you can try incorporating Halloween-themed nail art, such as spider webs, bats, or ghosts, using nail stamping plates, nail stickers, or hand-painted designs.
- Finish off with a top coat to seal the color and add shine to your black Halloween nails.
5. Can I create Halloween nails on short nails?
Absolutely! Short nails can be perfect for Halloween nail designs. Here are some ideas for Halloween nails on short nails:
- Create a simple and spooky look by painting your nails black and adding small white dots to resemble ghosts.
- Paint each nail a different Halloween color, such as orange, purple, black, or green, and add a contrasting accent nail with a spooky design like a spider or a skull.
- Use nail wraps or stickers designed specifically for short nails. These often come in various Halloween themes and can be easily applied to create an instant festive look.
- Try negative space designs, where you leave a portion of your nails unpainted to create a pattern or shape. For example, you can create a spider web design on a few nails while keeping the rest of the nails a solid color.
6. How can I create simple Halloween nails?
If you prefer a more simple and understated look for Halloween, consider these ideas for creating simple Halloween nails:
- Opt for a single-color nail polish in a Halloween theme, such as black, orange, or purple. You can also choose a subtle metallic shade like copper or silver.
- Apply a glossy or matte top coat to add a finished look without any additional nail art.
- Use nail art stickers or water decals for an easy way to add Halloween-themed designs to your nails. These can include bats, pumpkins, or ghosts, among others.
- Create a minimalist Halloween design by using a thin nail art brush to paint simple shapes like a ghost, spider, or bat on one or two accent nails, while keeping the other nails a solid color.
- Use negative space techniques, such as leaving a portion of your nails unpainted or using striping tape to create clean, geometric designs.
7. How can I incorporate pink into my Halloween nails?
If you want to incorporate pink into your Halloween nails, consider the following ideas:
- Paint your nails with a pink base color and add black accents like bats, spiders, or webs for a cute and spooky contrast.
- Create a gradient effect by painting your nails with a pink-to-black ombre. You can achieve this by blending the two colors together using a sponge or a nail art brush.
- Apply a pink base and use black nail polish to create Halloween-themed designs such as pumpkins, skulls, or witches on one or two accent nails.
- Add pink rhinestones or glitter to your Halloween nail design to give it a touch of sparkle while maintaining a pink color scheme.
8. What are some Halloween nail ideas and designs?
Here are a few Halloween nail ideas and designs to inspire you:
- Jack-o’-lantern nails: Paint your nails orange and create jack-o’-lantern faces using black nail polish.
- Witch nails: Paint your nails black or purple and add witch hat or broomstick designs using contrasting colors.
- Spider web nails: Apply a black base coat and use a thin nail art brush to create spider web designs in white or silver.
- Vampire nails: Paint your nails red and add vampire fangs or blood drips using black or white nail polish.
- Candy corn nails: Create a gradient effect using orange, yellow, and white nail polish to mimic the colors of candy corn.
- Zombie nails: Paint your nails a base color of gray or green and add stitches or oozing wounds using black or red nail polish.
- Skeleton nails: Apply a black or white base coat and paint skeletal hands or bone patterns using the contrasting color.
- Haunted house nails: Use various colors to depict a spooky haunted house with bats, ghosts, or tombstones.
9. Can I create Halloween-themed gel nails?
Yes, you can definitely create Halloween-themed gel nails. Here’s how:
- Prepare your nails by removing any old gel polish and shaping them as desired.
- Apply a base coat to protect your natural nails and provide a smooth surface for the gel polish.
- Choose your desired Halloween-themed gel polish colors. Popular choices include black, orange, purple, and green.
- Apply the gel polish in thin, even layers, curing each layer under a UV or LED lamp according to the manufacturer’s instructions.
- Once the color is applied and cured, you can add Halloween-themed nail art using gel paints, stamping plates, or nail stickers.
- Finish off with a layer of gel top coat to seal the design and add shine to your Halloween gel nails. Cure the top coat under the lamp.
- Cleanse your nails with alcohol or a gel cleanser to remove any sticky residue left behind from the gel polish.
10. How can I achieve red Halloween nails?
To achieve red Halloween nails, follow these steps:
- Start by preparing your nails. Remove any existing nail polish and shape your nails as desired.
- Apply a base coat to protect your nails and help the nail polish adhere better.
- Once the base coat is dry, apply two coats of red nail polish. Make sure to wait for each coat to dry before applying the next.
- If you want to add a Halloween twist, you can incorporate Halloween-themed nail art such as black spider webs, vampire teeth, or dripping blood using nail stamps, stencils, or hand-painted designs.
- Finish off with a top coat to seal the color and add shine to your red Halloween nails.
11. What are some Halloween nail designs for short nails?
If you have short nails and want Halloween-themed designs, consider these ideas:
- Paint each nail a different Halloween color, such as orange, black, purple, or green, and add small accents like ghosts, spiders, or bats using a fine nail art brush.
- Create a simple yet spooky look by painting your nails black and adding tiny white dots or lines to represent ghosts or spider webs.
- Opt for nail wraps or stickers designed for short nails. These often come in various Halloween themes and can be easily applied to create an instant festive look.
- Experiment with negative space designs, leaving a portion of your nails unpainted and creating patterns or shapes like spider webs, skulls, or pumpkins.
- Use metallic nail polishes in Halloween colors, such as copper, silver, or gold, and add minimalistic designs like moon and star shapes or geometric patterns.
12. How can I achieve white Halloween nails?
To achieve white Halloween nails, follow these steps:
- Begin by preparing your nails. Remove any old nail polish and shape your nails as desired.
- Apply a base coat to protect your nails and provide a smooth surface for the white nail polish.
- Once the base coat is dry, apply two coats of white nail polish, waiting for each coat to dry before applying the next.
- For a simple Halloween twist, you can add accents like black bats, ghosts, or spider webs using a nail art brush or nail stamps.
- Alternatively, you can create a negative space design by leaving some parts of your nails unpainted and adding small black or orange details like stripes, dots, or Halloween symbols.
- Finish off with a top coat to seal the color and add shine to your white Halloween nails.
13. How can I achieve coffin-shaped Halloween nails?
To achieve coffin-shaped Halloween nails, you can follow these steps:
- Start by preparing your nails. Trim them to your desired length, keeping the ends squared off.
- Use a nail file to shape the edges of your nails into a tapered, coffin shape. File at a slight angle from the sides toward the center, creating a straight edge.
- Apply a base coat to protect your nails and help the nail polish adhere better.
- Choose your desired Halloween nail polish color(s) and apply two coats, waiting for each coat to dry before applying the next.
- If you want to add Halloween-themed designs, you can use nail art techniques such as stamping, hand-painting, or adding nail stickers. Popular Halloween motifs for coffin-shaped nails include spider webs, skulls, pumpkins, or witches.
- Finish off with a top coat to seal the color and design, and add shine to your coffin-shaped Halloween nails.
14. How can I achieve purple Halloween nails?
To achieve purple Halloween nails, you can follow these steps:
- Start by preparing your nails. Remove any old nail polish and shape your nails as desired.
- Apply a base coat to protect your nails and help the nail polish adhere better.
- Once the base coat is dry, apply two coats of purple nail polish. Make sure to wait for each coat to dry before applying the next.
- For a Halloween twist, you can add accents like black cats, moons, or bats using a fine nail art brush or nail stamps.
- Alternatively, you can create a gradient effect by using a sponge and applying a lighter shade of purple at the base of your nails, gradually transitioning to a darker shade toward the tips.
- Finish off with a top coat to seal the color and add shine to your purple Halloween nails.
15. Can I create Halloween-themed acrylic nails?
Yes, you can create Halloween-themed acrylic nails.
Here’s how:
- Visit a professional nail technician who specializes in acrylic nails. They will be able to help you achieve the desired Halloween-themed designs.
- Discuss your ideas with the nail technician and show them any reference pictures or inspirations you have for your Halloween-themed acrylic nails.
- Choose the acrylic nail shapes and lengths that suit your preferences. Popular options for Halloween nails include stiletto, coffin, or square shapes.
- Select the colors and designs you want for your Halloween-themed nails. Consider incorporating Halloween symbols like pumpkins, ghosts, skulls, or bats, or opting for colors such as orange, black, purple, or green.
- The nail technician will proceed to apply the acrylic material, shape your nails, and add the desired designs using techniques like hand-painting, nail stamps, or embedding nail art decorations.
- Finally, the nails will be finished off with a top coat for added protection and shine, leaving you with stunning Halloween-themed acrylic nails.
16. How can I achieve pink Halloween nails?
To achieve pink Halloween nails, you can follow these steps:
- Start by preparing your nails. Remove any old nail polish and shape your nails as desired.
- Apply a base coat to protect your nails and help the nail polish adhere better.
- Once the base coat is dry, apply two coats of pink nail polish. Make sure to wait for each coat to dry before applying the next.
- For a Halloween twist, you can add accents like black bats, cats, or spiders using a fine nail art brush or nail stamps.
- Alternatively, you can create a gradient effect by using a sponge and applying a darker shade of pink at the base of your nails, gradually transitioning to a lighter shade toward the tips.
- Finish off with a top coat to seal the color and add shine to your pink Halloween nails.
17. How can I achieve long Halloween nails?
To achieve long Halloween nails, you have a few options:
- Grow out your natural nails: Maintain proper nail care by keeping your nails clean, moisturized, and protected. Use strengthening treatments and nail-friendly products to promote healthy nail growth.
- Use nail extensions: Visit a professional nail technician who can apply nail extensions to give you the desired length. Nail extensions can be made of acrylic, gel, or other materials, and they can be shaped and designed according to your preferences.
- Use press-on nails: Purchase press-on nails in the length and style you desire. These nails come with adhesive tabs or glue for easy application and removal, allowing you to achieve long Halloween nails temporarily.
- Apply nail tips: Nail tips are a type of nail extension that can be glued onto your natural nails to add length. You can then shape and design them as desired, incorporating Halloween-themed nail art or colors.
18. How can I achieve pumpkin-themed Halloween nails?
To achieve pumpkin-themed Halloween nails, you can follow these steps:
- Start by preparing your nails. Remove any old nail polish and shape your nails as desired.
- Apply a base coat to protect your nails and help the nail polish adhere better.
- Once the base coat is dry, paint your nails with a bright orange nail polish. Make sure to apply two coats for full opacity, waiting for each coat to dry before applying the next.
- Using a fine nail art brush or a dotting tool, create pumpkin faces on your nails using black nail polish or acrylic paint. Start by painting two triangular eyes, followed by a triangle-shaped nose, and finish with a smiling mouth made of curved lines.
- Add dimension and detail to your pumpkin faces by painting small white dots for highlights or using a lighter shade of orange to create shading and depth.
- Finish off with a top coat to seal the design and add shine to your pumpkin-themed Halloween nails.
19. Can I create Halloween-themed ombre nails?
Yes, you can create Halloween-themed ombre nails.
Follow these steps:
- Start by preparing your nails. Remove any old nail polish and shape your nails as desired.
- Apply a base coat to protect your nails and help the nail polish adhere better.
- Choose two or more Halloween-themed nail polish colors that you want to use for your ombre effect. For example, you can select shades like black, orange, purple, or green.
- Apply the lightest color as the base color on your nails and let it dry.
- Take a makeup sponge and apply lines of your chosen colors next to each other, slightly overlapping, on the sponge. Make sure the lines are wide enough to cover the width of your nail.
- Press the sponge onto your nail and gently dab the colors onto the nail surface. Repeat this step until you achieve the desired ombre effect. You may need to reapply the nail polish on the sponge for each nail.
- Clean up any excess polish around your cuticles using a brush dipped in nail polish remover.
- Apply a top coat to smooth out the ombre effect and add shine to your Halloween-themed ombre nails.
20. Can I create Halloween-themed blue nails?
Yes, you can create Halloween-themed blue nails.
Follow these steps:
- Start by preparing your nails. Remove any old nail polish and shape your nails as desired.
- Apply a base coat to protect your nails and help the nail polish adhere better.
- Once the base coat is dry, apply two coats of blue nail polish. Make sure to wait for each coat to dry before applying the next.
- For a Halloween twist, you can add accents like black bats, cats, or spider webs using a fine nail art brush or nail stamps.
- Alternatively, you can create a gradient effect by using a sponge and applying a darker shade of blue at the base of your nails, gradually transitioning to a lighter shade toward the tips.
- Finish off with a top coat to seal the color and add shine to your blue Halloween nails.
21. Where can I find pictures of Halloween nails for inspiration?
You can find pictures of Halloween nails for inspiration in several places, including:
- Online platforms: Search on platforms such as Pinterest, Instagram, or beauty websites. Use keywords like “Halloween nails,” “Halloween nail art,” or specific Halloween nail design themes to find a wide range of pictures and ideas.
- Social media: Follow nail artists, beauty bloggers, or nail-related accounts on platforms like Instagram or TikTok. They often share pictures and videos of Halloween nail designs, providing inspiration for your own nails.
- Nail art forums and communities: Join online forums or communities focused on nail art. Members often share pictures of their latest designs, including Halloween-themed nails. You can interact with fellow nail enthusiasts and exchange ideas.
- Nail salons’ portfolios: Check the websites or social media pages of local nail salons. They usually showcase their work in portfolios or photo galleries, which can inspire your Halloween nail design choices.
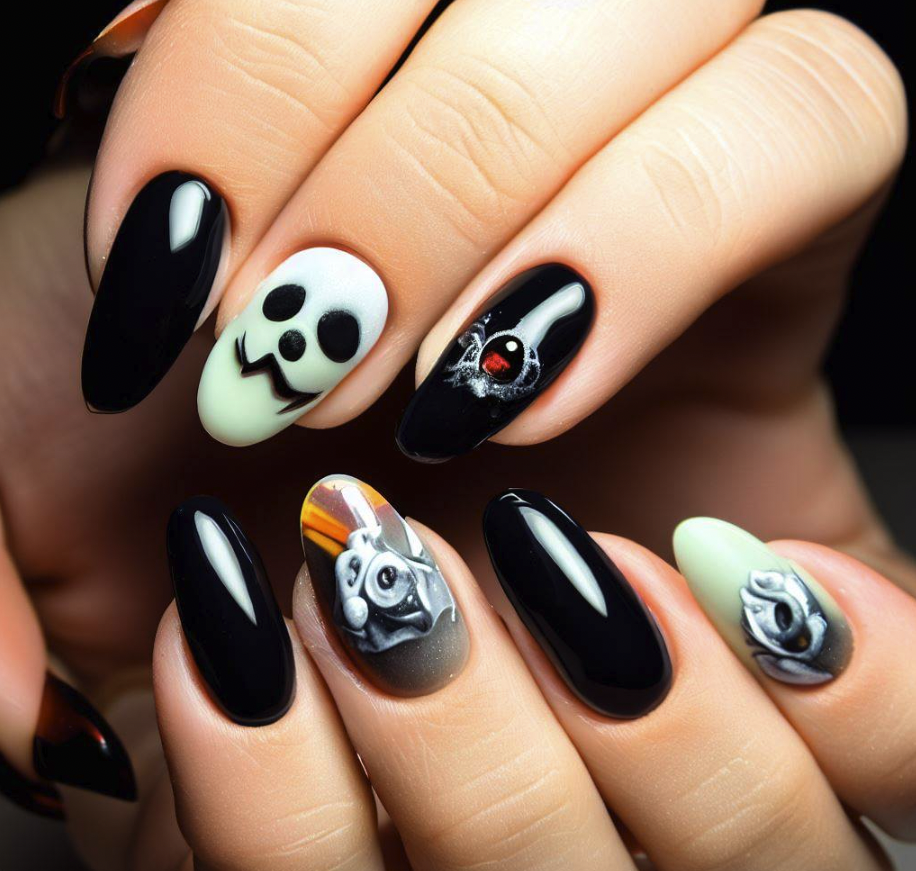
22. Can I create Halloween-themed ghost nails?
Yes, you can create Halloween-themed ghost nails.
Here’s how:
- Start by preparing your nails. Remove any old nail polish and shape your nails as desired.
- Apply a base coat to protect your nails and help the nail polish adhere better.
- Once the base coat is dry, choose a light-colored nail polish like white or a pale gray for the ghostly effect.
- Apply two coats of the chosen color, waiting for each coat to dry before applying the next.
- Using a fine nail art brush or a dotting tool, create ghost shapes on your nails. Start by painting a rounded head shape near the cuticle area and extend it with a slightly curved body shape toward the tip of your nail.
- Add eyes and a mouth to your ghost shapes using black nail polish or acrylic paint. You can create different expressions for each ghost, such as happy, surprised, or scared.
- Finish off with a top coat to seal the design and add shine to your Halloween-themed ghost nails.
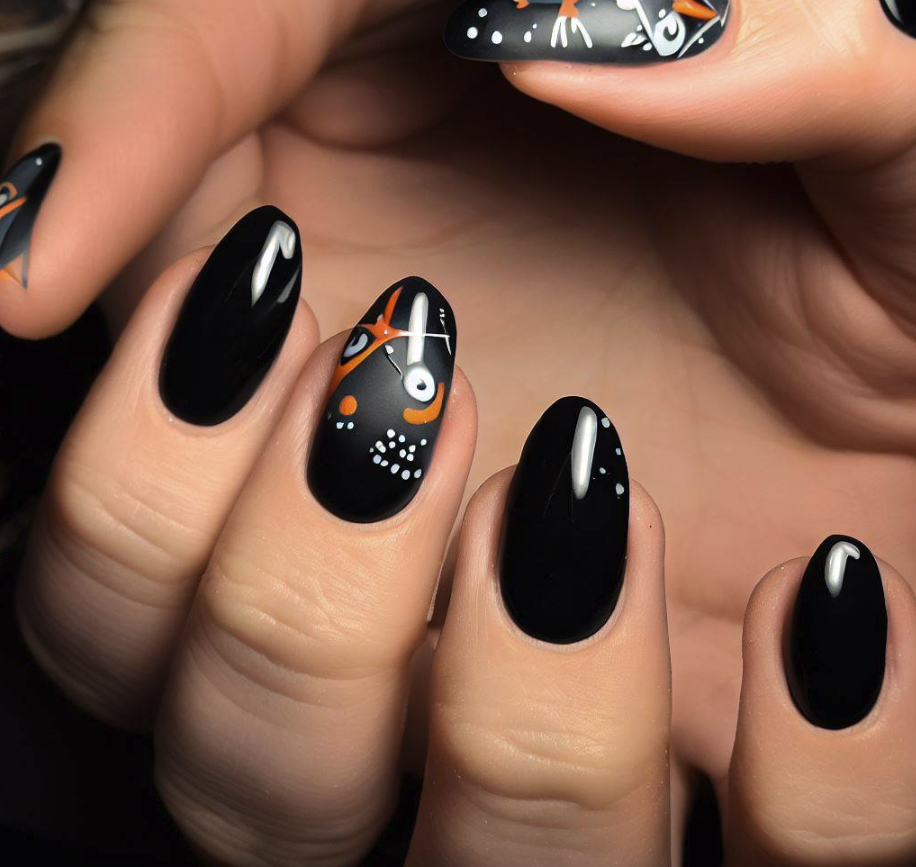
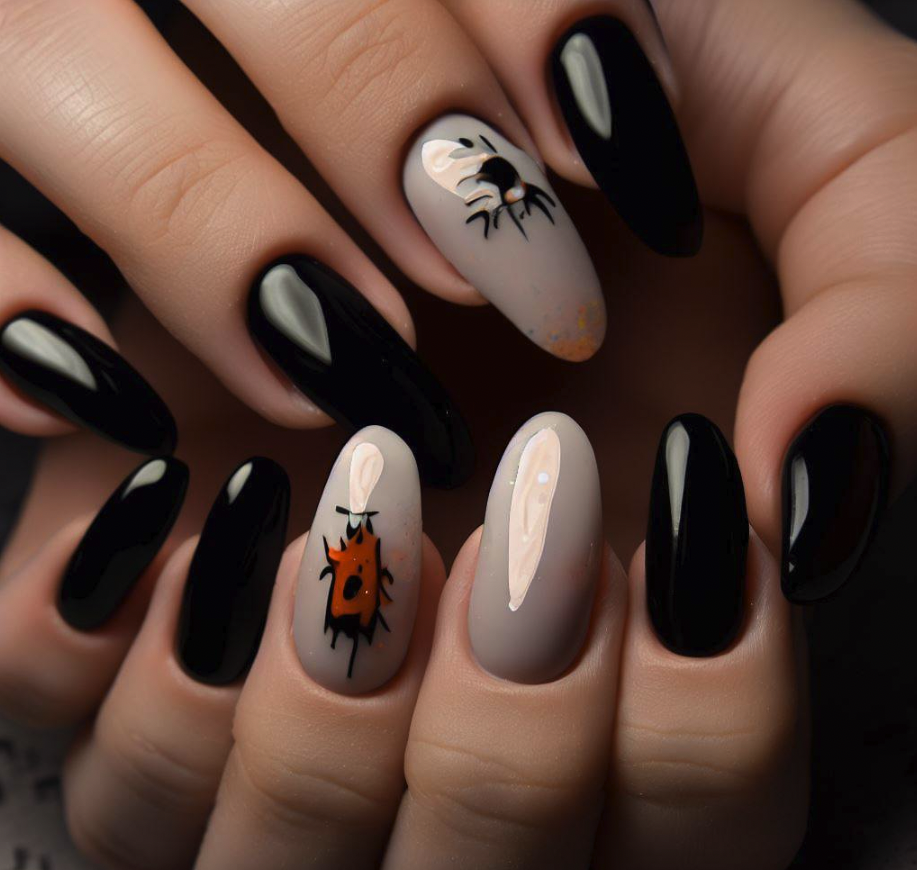
23. How can I create creepy Halloween nails?
If you want to create creepy Halloween nails, consider these ideas:
- Choose a dark base color such as black, deep purple, or blood red.
- Add creepy elements like spiders, cobwebs, skulls, or eerie eyes using nail art brushes, nail stamps, or decals.
- Incorporate textures like matte nail polish, glitter, or 3D nail decorations to give a creepy and unsettling effect.
- Experiment with asymmetrical or irregular patterns to create an unsettling and unpredictable design.
- Use negative space techniques to create a mysterious and creepy vibe. Leave portions of your nails unpainted or use clear or sheer polish to create ghostly illusions.
- Consider adding dripping blood effects using red nail polish or creating cracked or distressed patterns for a worn and haunting look.
- Opt for long and pointed nail shapes, such as stiletto or almond, to enhance the creepiness factor.
24. Can I use fake nails for Halloween designs?
Yes, you can use fake nails for Halloween designs.
Fake nails, such as press-on nails or nail tips, are a convenient and versatile option for creating Halloween-themed nail designs.
They come in various shapes, lengths, and designs, including Halloween-specific themes.
Here’s how you can use fake nails for Halloween designs:
- Choose the type of fake nails you prefer, such as press-on nails or nail tips.
- Select the desired length and shape of the fake nails. Consider shapes like stiletto, coffin, square, or almond, which are popular for Halloween designs.
- If the fake nails are not pre-designed with Halloween themes, you can paint them with Halloween-inspired colors like black, orange, purple, or green. Add accents or nail art using nail polish, acrylic paint, nail stamps, or nail stickers.
- Apply the fake nails according to the instructions provided with the product. This usually involves preparing your natural nails, applying adhesive or glue, and carefully aligning and pressing the fake nails onto your natural nails.
- Once the fake nails are securely attached, you can further enhance the Halloween design by adding additional decorations or details, such as rhinestones, studs, charms, or 3D nail art.
25. Can I create Halloween-themed orange nails?
Yes, you can create Halloween-themed orange nails.
Follow these steps:
- Start by preparing your nails. Remove any old nail polish and shape your nails as desired.
- Apply a base coat to protect your nails and help the nail polish adhere better.
- Once the base coat is dry, apply two coats of orange nail polish. Make sure to wait for each coat to dry before applying the next.
- For a Halloween twist, you can add accents like black bats, cats, or pumpkins using a fine nail art brush or nail stamps.
- Alternatively, you can create a gradient effect by using a sponge and applying a darker shade of orange at the base of your nails, gradually transitioning to a lighter shade toward the tips.
- Finish off with a top coat to seal the color and add shine to your orange Halloween nails.
26. Can I create Halloween-themed coffin nails for 2026?
Yes, you can create Halloween-themed coffin nails for 2026.
Coffin-shaped nails are trendy and perfect for Halloween designs.
Here’s how you can achieve them:
- Start by preparing your nails. Remove any old nail polish and shape your nails into a tapered square shape.
- Apply a base coat to protect your nails and help the nail polish adhere better.
- Once the base coat is dry, choose your desired Halloween-themed nail polish colors and apply them to your coffin-shaped nails. Popular choices include black, orange, purple, or green.
- If you want to add Halloween-themed designs, you can use nail art techniques such as stamping, hand-painting, or adding nail stickers. Consider incorporating Halloween symbols like spiders, bats, pumpkins, or witches.
- Finish off with a top coat to seal the color and design, and add shine to your coffin-shaped Halloween nails for 2023.
27. Can I create Halloween-themed short nails for 2026?
Yes, you can create Halloween-themed short nails for 2026.
Short nails can be perfect for Halloween designs.
Here’s how you can achieve them:
- Start by preparing your nails. Remove any old nail polish and shape your nails to your desired length.
- Apply a base coat to protect your nails and help the nail polish adhere better.
- Once the base coat is dry, choose your desired Halloween-themed nail polish colors and apply them to your short nails. Popular choices include black, orange, purple, or green.
- If you want to add Halloween-themed designs, you can use nail art techniques such as stamping, hand-painting, or adding nail stickers. Consider incorporating Halloween symbols like spiders, bats, pumpkins, or witches.
- Finish off with a top coat to seal the color and design, and add shine to your short Halloween nails for 2026.
28. Can I create Halloween-themed purple nails?
Yes, you can create Halloween-themed purple nails.
Follow these steps:
- Start by preparing your nails. Remove any old nail polish and shape your nails as desired.
- Apply a base coat to protect your nails and help the nail polish adhere better.
- Once the base coat is dry, apply two coats of purple nail polish. Make sure to wait for each coat to dry before applying the next.
- For a Halloween twist, you can add accents like black bats, cats, or spider webs using a fine nail art brush or nail stamps.
- Alternatively, you can create a gradient effect by using a sponge and applying a darker shade of purple at the base of your nails, gradually transitioning to a lighter shade toward the tips.
- Finish off with a top coat to seal the color and add shine to your purple Halloween nails.
29. Can I create pretty Halloween nails?
Yes, you can create pretty Halloween nails.
Consider the following ideas:
- Choose a soft color palette such as pastels or muted shades. Light pink, lavender, mint green, or soft gray can create a pretty and delicate base for your Halloween nails.
- Add feminine accents like delicate floral patterns, lace designs, or intricate swirls using a fine nail art brush or nail stamps.
- Incorporate subtle Halloween elements like small pumpkins, cute ghosts, or tiny bats as accents on a few nails, leaving the rest with a simple and elegant design.
- Experiment with negative space designs, creating delicate cut-out patterns or leaving parts of your nails unpainted for an understated and pretty look.
- Add a touch of sparkle with glitter nail polish or rhinestones in coordinating colors to elevate the overall prettiness of your Halloween nails.
30. How can I find a nail salon near me that offers Halloween-themed nail services?
To find a nail salon near you that offers Halloween-themed nail services, consider the following methods:
- Online search: Use search engines like Google or Bing and enter keywords such as “nail salon near me” or “Halloween nail services.” The search results will provide you with a list of nearby nail salons that may offer Halloween-themed services.
- Review websites and apps: Visit review websites or download apps like Yelp, TripAdvisor, or Google Maps. These platforms allow you to search for nail salons in your area and read reviews from customers who may have mentioned Halloween-themed services or special events.
- Social media: Check social media platforms such as Instagram, Facebook, or Twitter. Many nail salons share their work and promotions on these platforms. You can search for local salons and browse through their posts or hashtags related to Halloween nails.
- Ask for recommendations: Reach out to friends, family, or colleagues who have had their nails done for Halloween in the past. They may be able to recommend a local salon or nail technician who offers Halloween-themed services.
- Visit local beauty supply stores: Visit local beauty supply stores and inquire if they offer a list of recommended nail salons in the area or if they have any information about salons offering Halloween-themed nail services.
- Contact local nail salons directly: Call or visit nearby nail salons and ask if they offer Halloween-themed nail services. Inquire about their availability, pricing, and any specific designs or themes they offer for the Halloween season.